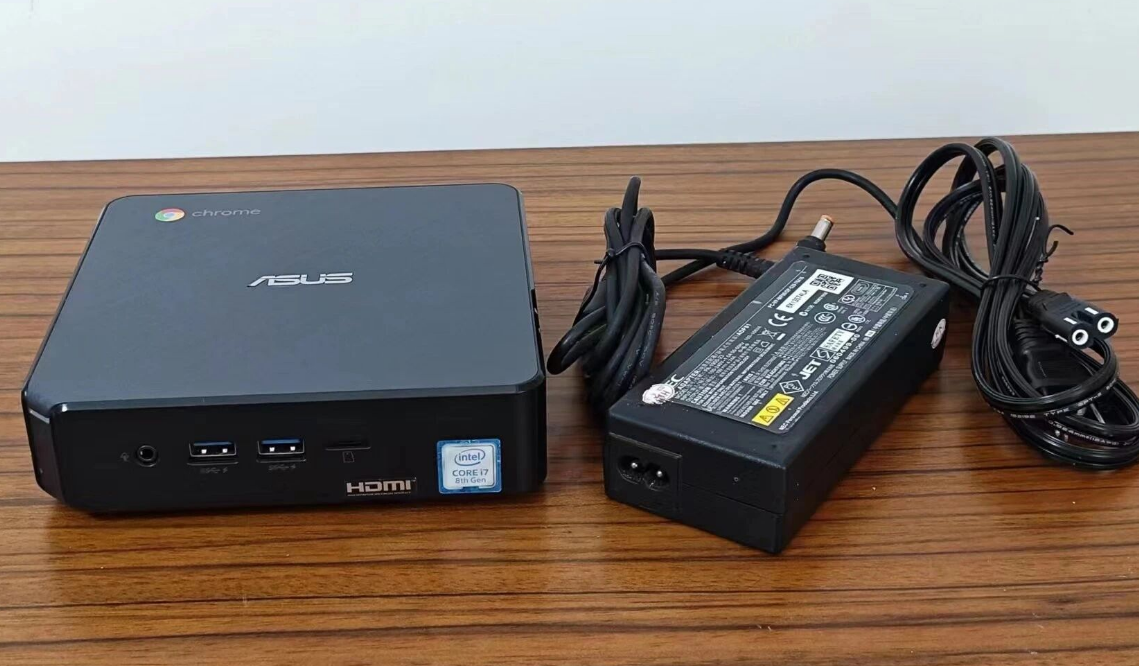
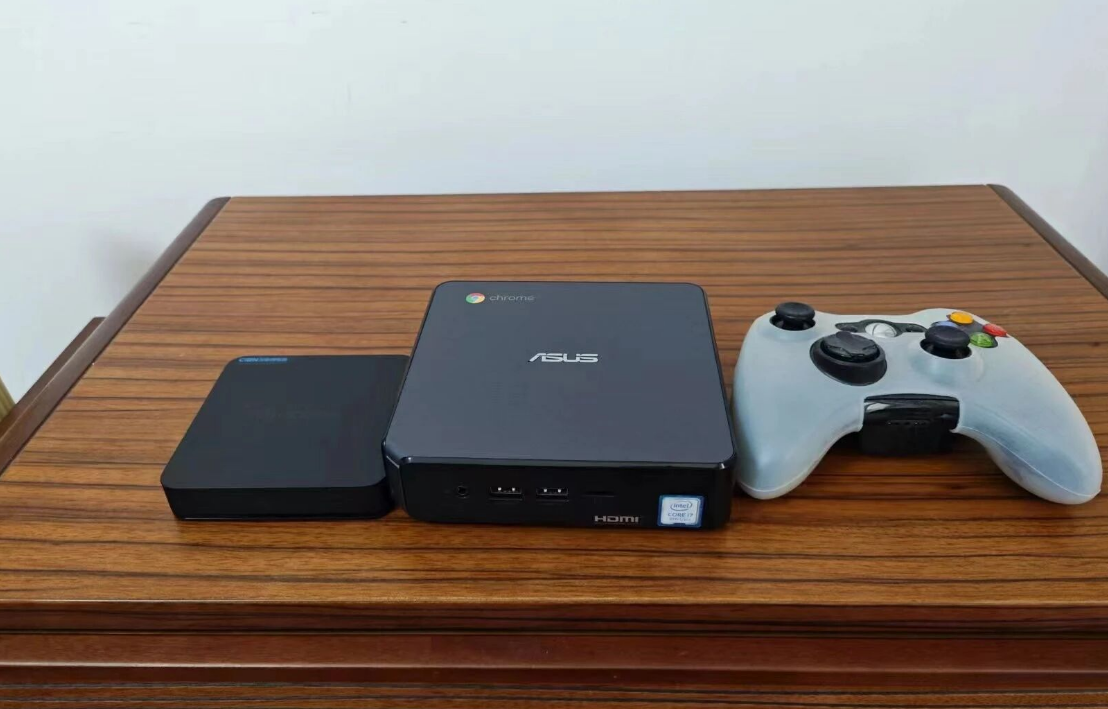
The ASUS Chromebox 3 (CN65) is having a renaissance. Originally marketed as a secure, simple web portal for schools and businesses, this device has flooded the secondary market (think eBay and surplus auctions) at incredible price points. For the average consumer, it’s a simple ChromeOS box. But for the tech-savvy, it represents one of the most cost-effective Intel NUC alternatives available today—if you know how to unlock it.
Whether you snagged a base Celeron model or the powerful Core i7-8550U version, this guide breaks down how to upgrade the hardware, bypass the software restrictions using the legendary "MrChromebox" method, and transform this tiny unit into a capable Windows desktop or a Plex media server.
1. Why the Chromebox 3? The "Poor Man's NUC"
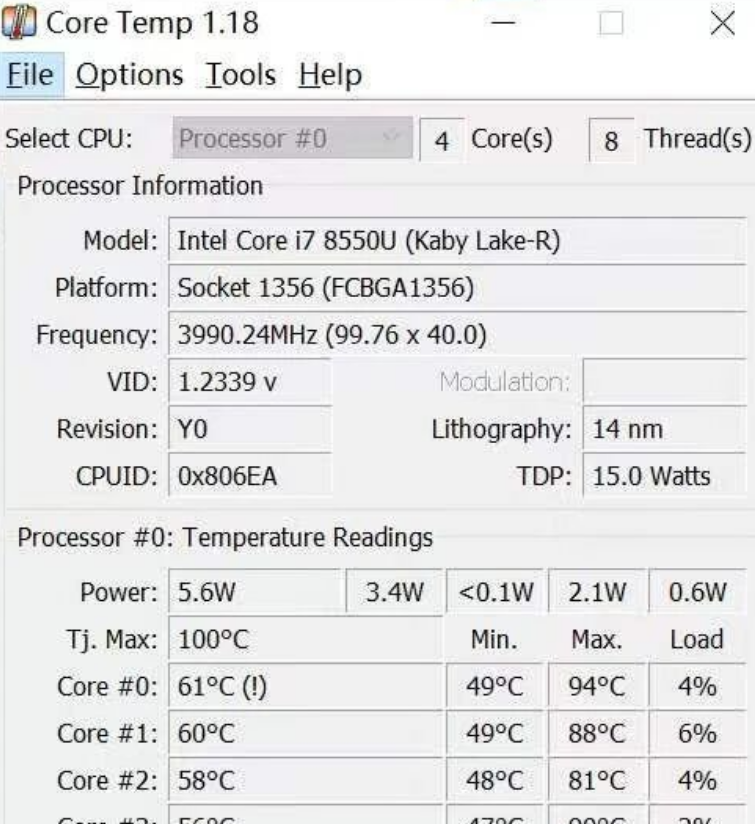
While typical NUCs (Next Unit of Computing) command a premium, the Chromebox 3 offers similar architecture for a fraction of the cost. The top-tier configuration boasts an 8th Gen Intel Core i7-8550U, which is a quad-core beast capable of serious multitasking.
However, out of the box, it is limited by ChromeOS. To unleash its full potential, we need to replace the firmware and install a full desktop OS like Windows 10/11 or Linux.
2. Hardware Deep Dive: What You Need to Know Before Buying
Before you start tearing the device apart, you need to understand the hardware limitations that standard spec sheets often hide.
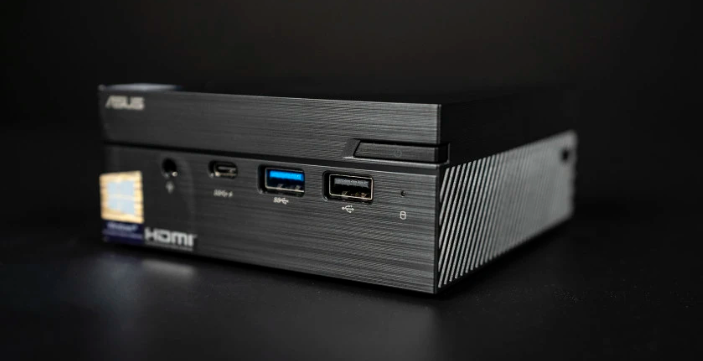
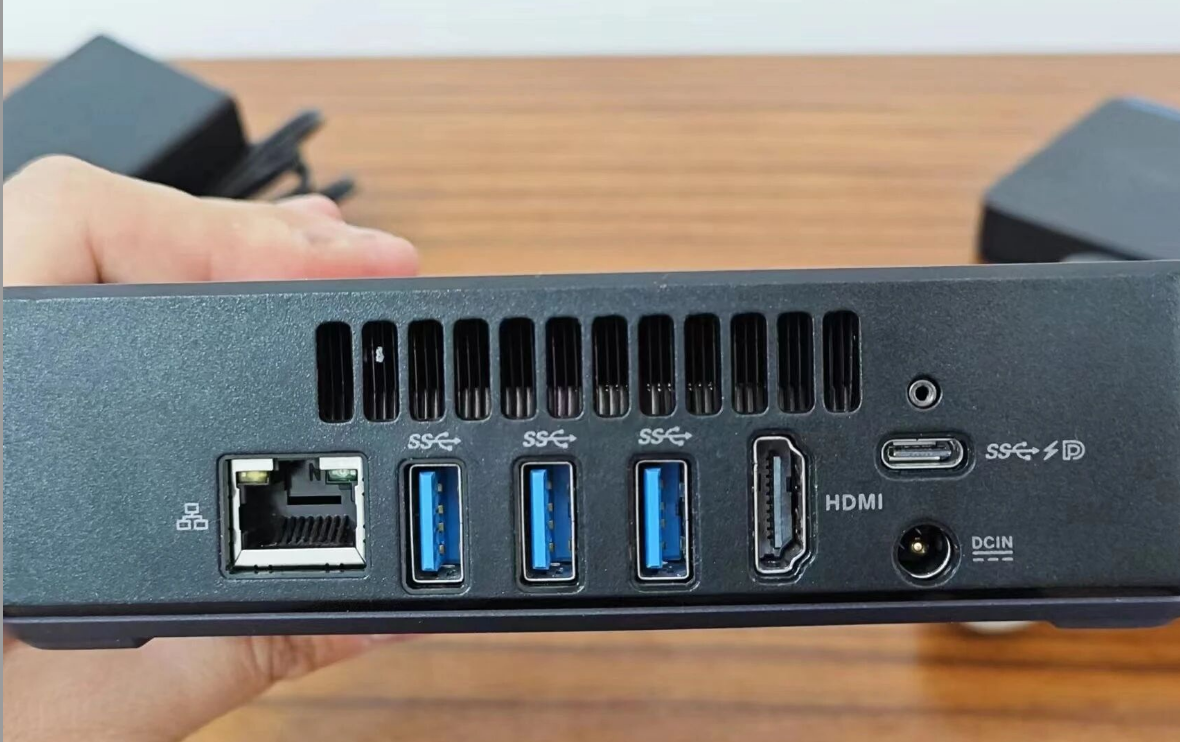
The Display Trap: HDMI 1.4 vs. USB-C
If you are planning to use this as a 4K Home Theater PC (HTPC), proceed with caution.
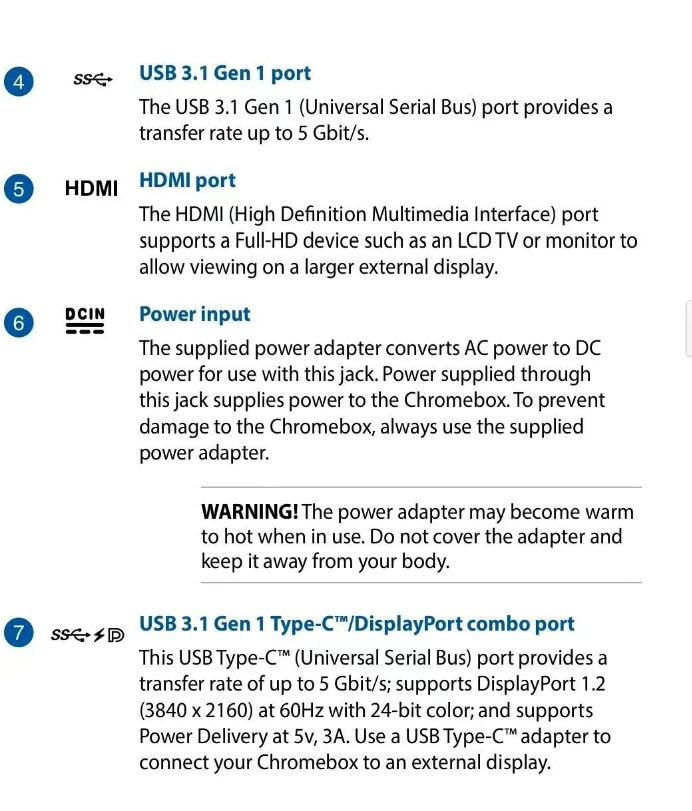
• The HDMI Port: It is strictly HDMI 1.4. This means if you connect a 4K monitor or TV here, you are capped at 4K @ 30Hz. This results in a choppy, laggy mouse experience that is frustrating for desktop use.
• The Solution: The rear USB Type-C port supports DisplayPort over USB-C. This is the only way to get a buttery smooth 4K @ 60Hz. If your monitor doesn't have USB-C, you will need a high-quality USB-C to DisplayPort or HDMI 2.0 adapter to get the full resolution and refresh rate.
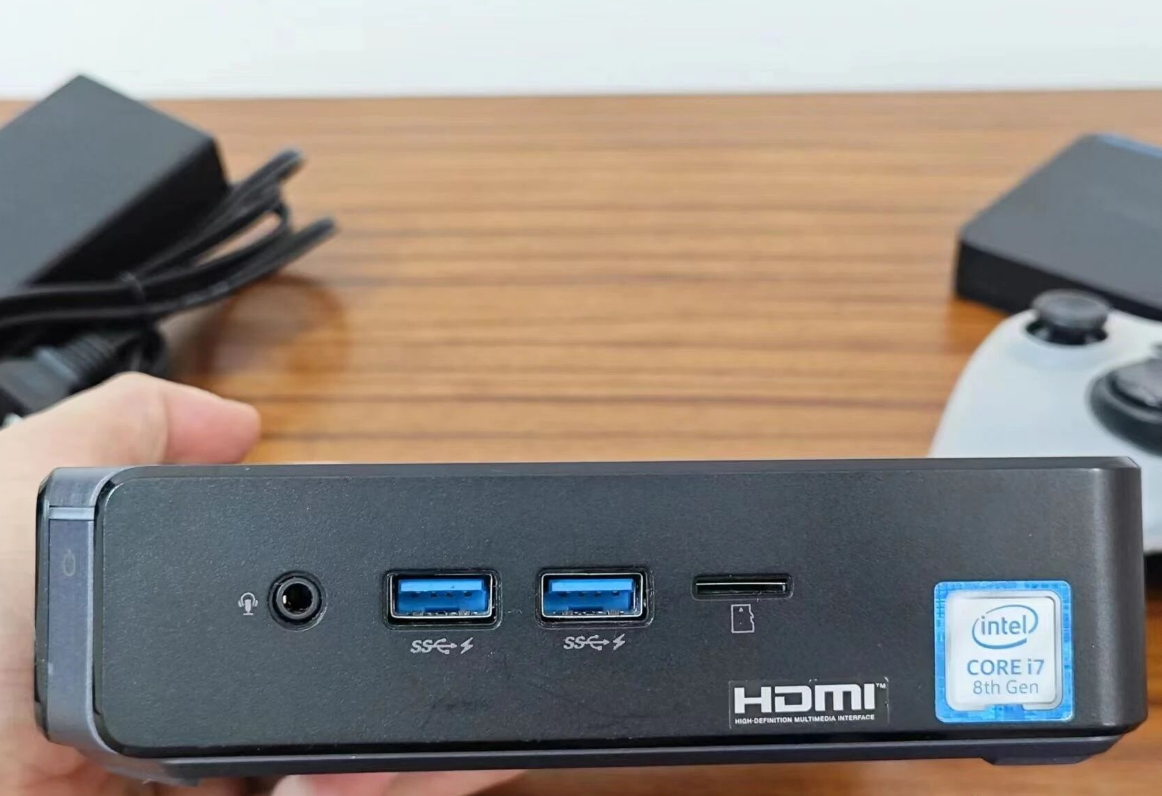
The Storage "Gotcha": Celeron vs. Core
Upgrading the storage is the first step for most users, as the stock 32GB or 64GB drives are insufficient for Windows. However, there is a critical architectural difference between the models:
• Core i3 / i7 Models: These fully support fast NVMe (PCIe) M.2 drives. You can drop in a Samsung EVO or WD Black NVMe drive and get top-tier read/write speeds.
• Celeron (e.g., 3865U) Models: These motherboards physically lack the NVMe lanes. Even though an NVMe drive will fit in the M.2 slot, the system will not see it. You must use an M.2 SATA SSD (like the WD Blue SA510 or similar legacy M.2 SATA drives) for the Celeron models. Many budget builders make the mistake of buying cheap NVMe drives only to find they are unrecognizable.
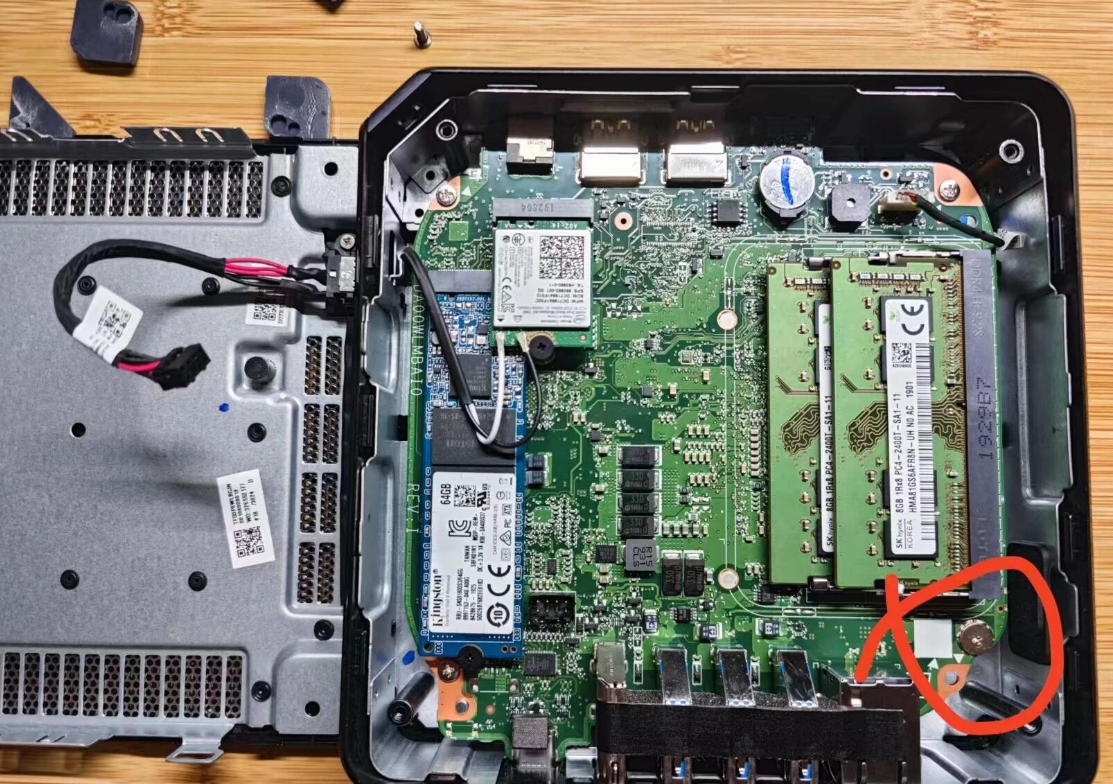
3. Step-by-Step: Cracking Open the Hardware
Disassembly is straightforward but requires care.
1. Remove the Feet: Peel back the four rubber feet on the bottom of the chassis.
2. Unscrew: Remove the four screws hiding beneath the rubber feet.
3. Pry: Gently pry the bottom lid open. Be careful—the ribbon cable for the power button connects the lid to the motherboard. Disconnect it gently.
Once inside, you have access to:
• RAM: Two DDR4 slots (up to 2400MHz supported on the i7-8550U). Dual-channel memory is highly recommended for performance.
• Storage: The M.2 2280 slot (remember the SATA vs. NVMe rule above).
• Wi-Fi: A replaceable Intel card (usually 7265NGW), which is Hackintosh-friendly if you swap it for a Broadcom card, though standard Windows users can keep the stock card.
• The "Magic" Screw: Located near the edge of the board, there is a distinct screw that acts as the hardware Write Protect (WP) mechanism. You must remove this screw to flash a custom UEFI BIOS.
4. The Firmware Mod: Installing Windows 10/11
To install Windows, we must replace the stock Google firmware with a custom UEFI firmware. We utilize the standard community scripts provided by MrChromebox.
Warning: This process voids your warranty and wipes all data. Proceed at your own risk.
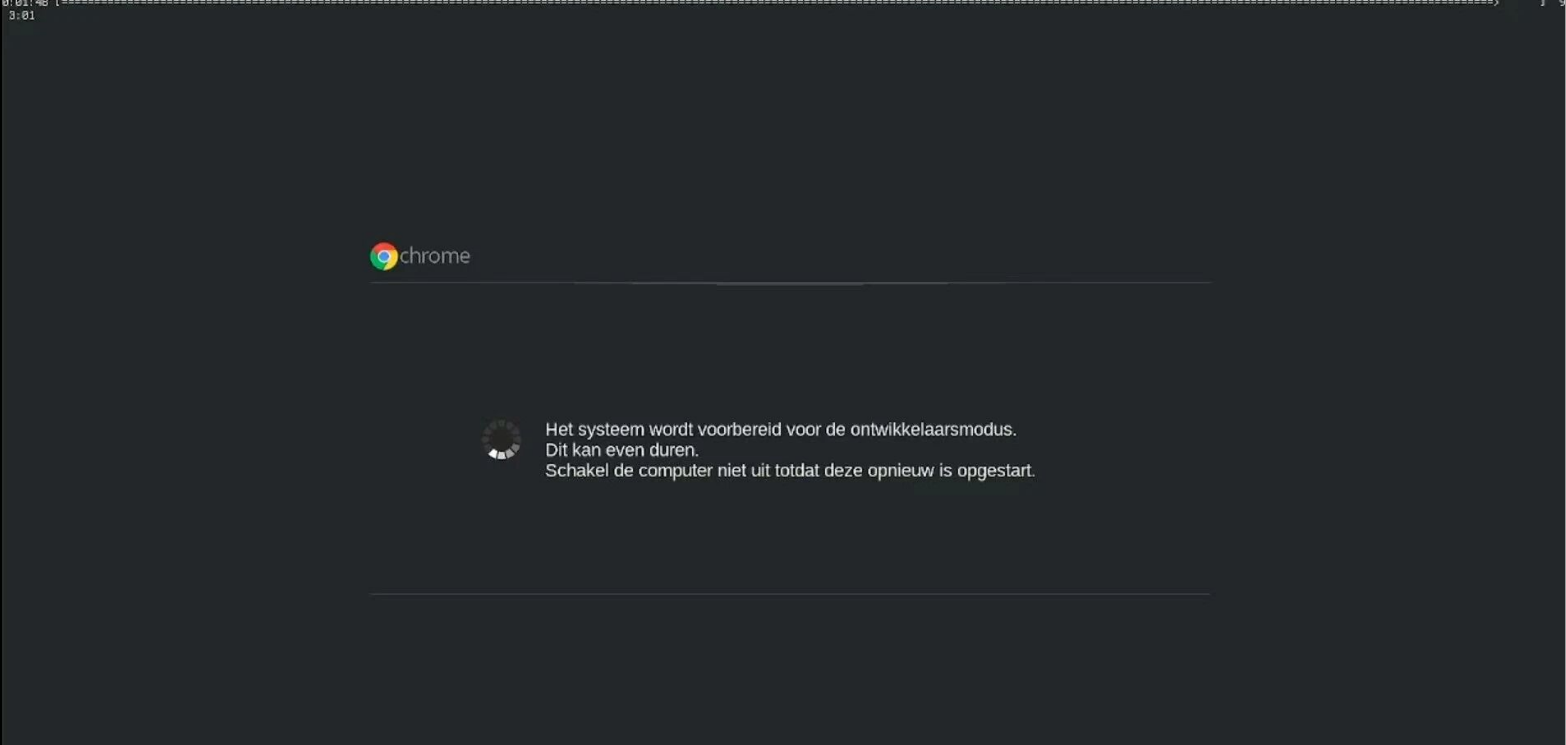
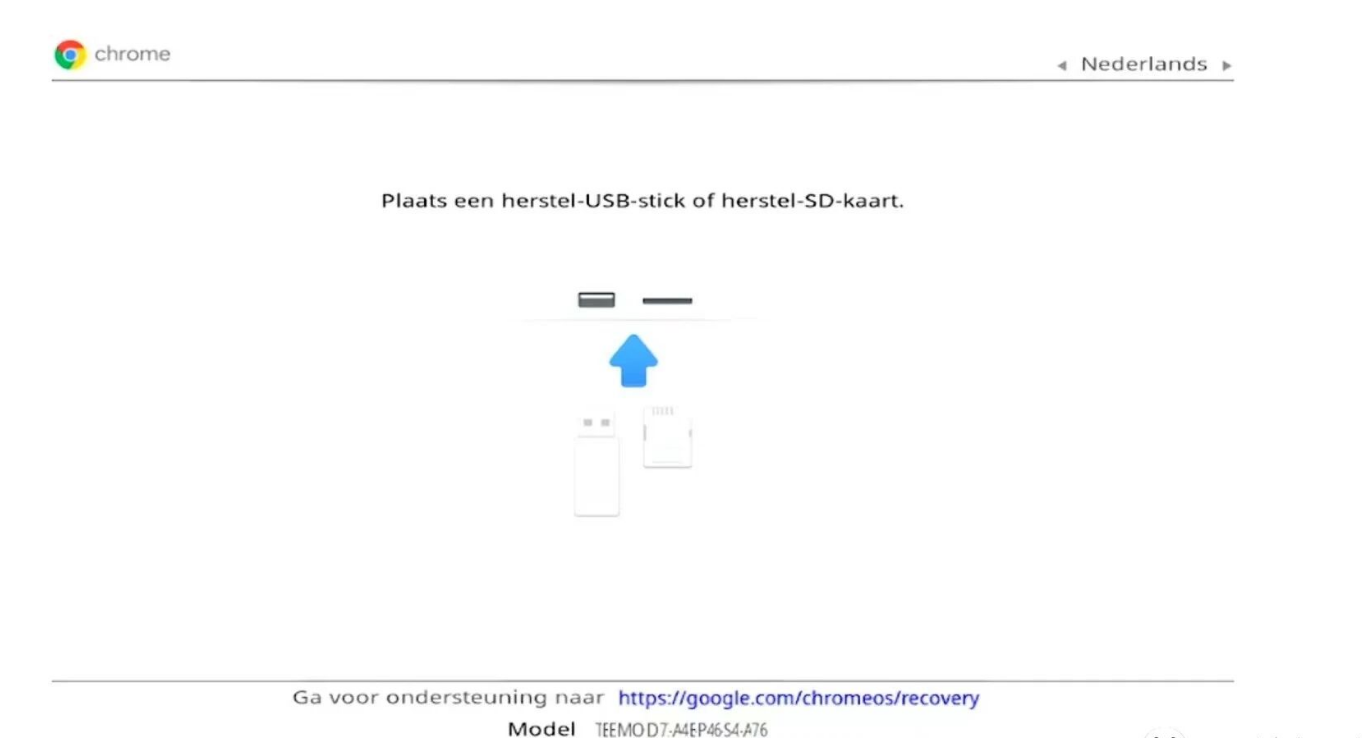
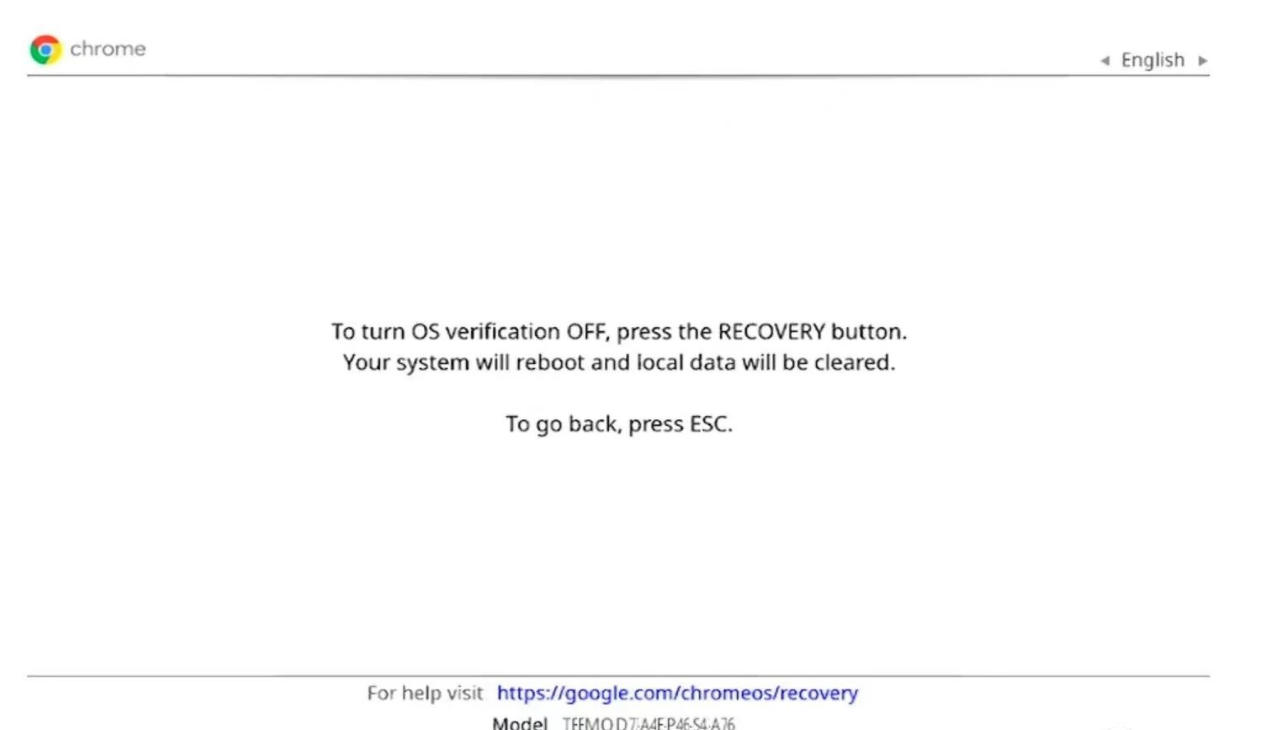
Phase 1: Developer Mode
1. With the device off, hold the small Recovery Button (often a pinhole near the lock slot or audio jack) and press the Power Button.
2. When you see the "ChromeOS is missing or damaged" screen, press Ctrl + D.
3. Press the recovery button again (or Enter) to confirm. The device will wipe itself and reboot into Developer Mode. (This takes 5-10 minutes).
Phase 2: Disabling Write Protect
1. Shut down the device.
2. Open the case (as detailed in section 3) and remove the Write Protect Screw.
3. Reassemble and boot back into ChromeOS (Developer Mode).
Phase 3: Flashing the Firmware
1. Connect the device to Wi-Fi.
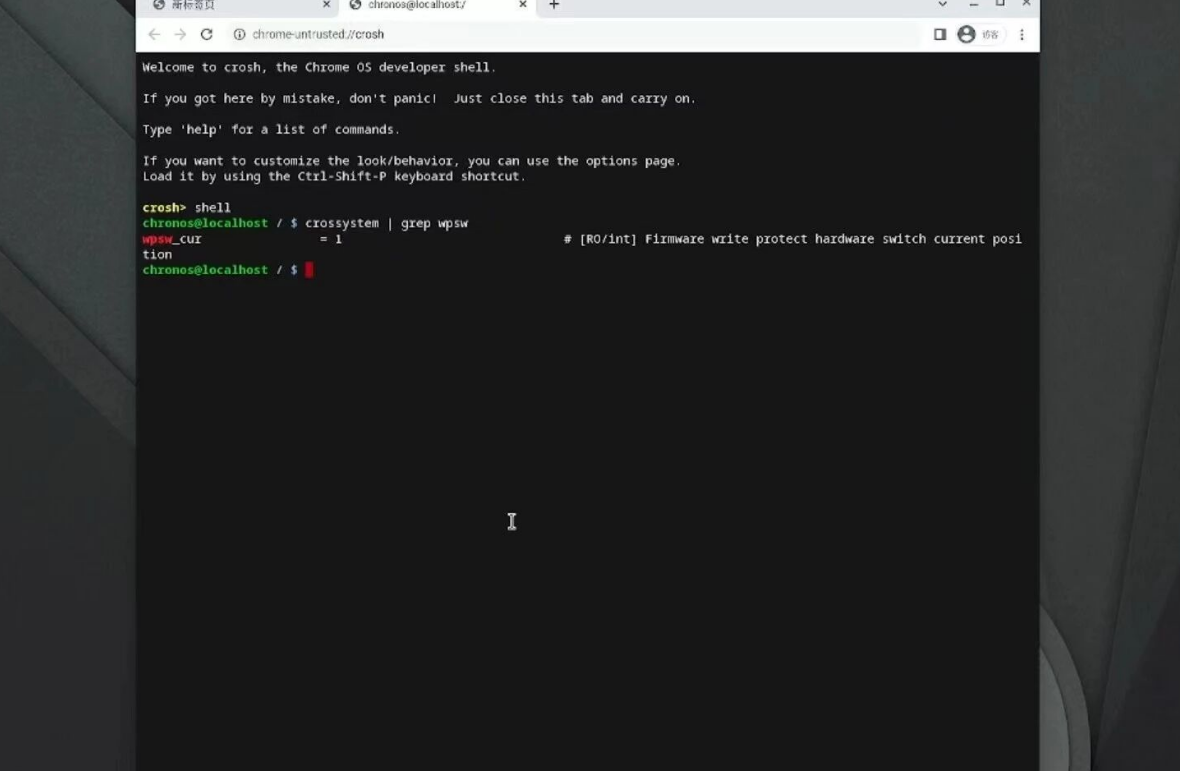
2. Open the ChromeOS terminal (Crosh) by pressing Ctrl + Alt + T.
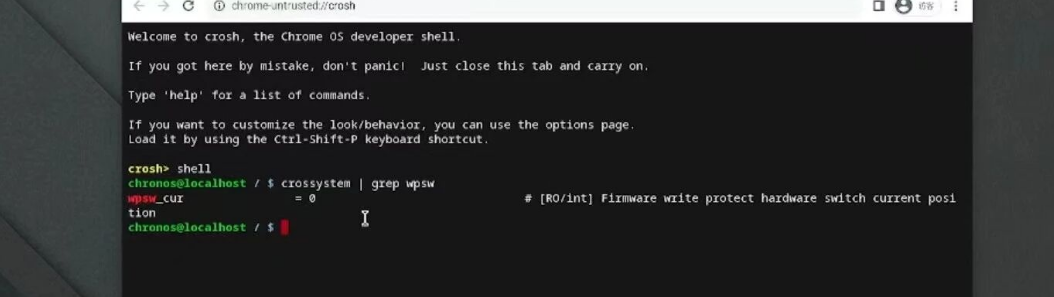
3. Type shell and hit Enter.
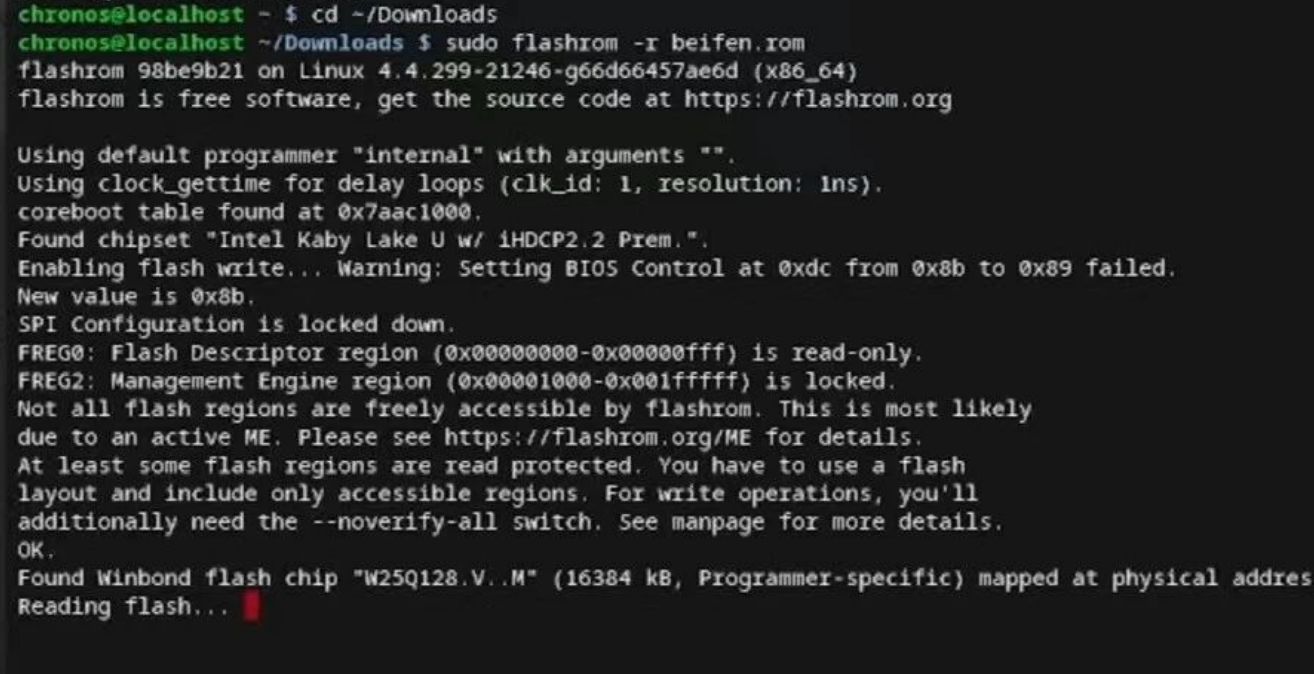
4. Copy and paste the MrChromebox Firmware Utility Script (available on the MrChromebox tech site).

5. Select the option for "Install/Update UEFI (Full ROM) Firmware."
6. Crucial Step: The script will ask to back up your original stock firmware to a USB drive. DO NOT SKIP THIS. If you ever want to sell the device or return it to stock, you need this file.
7. Once the flash is complete, power off.
Phase 4: Installing Windows
Insert your Windows 10/11 installation USB. The device will now boot just like a standard PC. Install Windows as normal.
5. Post-Installation Experience & Troubleshooting
Once Windows is running, the performance on the i7 model is comparable to a premium ultrabook. It handles web browsing, Office apps, and 4K media playback with ease. However, there are post-install quirks you need to address:
The "Jet Engine" Fan Issue
A common issue reported by modders on the CN65 model is aggressive fan behavior. Because the Embedded Controller (EC) is designed for ChromeOS, Windows may not manage fan curves correctly, causing the fan to spin at 100% or ramp up erratically even at low temps (30-40°C).
• The Fix: You will need to install specific EC drivers or use third-party fan control software (like "FanControl" or "Argus Monitor") to manually set a quieter curve. Do not rely on the BIOS default; it is often tuned for a different thermal profile.
Audio Drivers
While Windows 10/11 pulls most drivers automatically, audio over the 3.5mm jack can be hit-or-miss. You may experience static or "popping" sounds.
• The Fix: Look for community-sourced drivers (often found on the "Chrultrabook" forums or subreddit) specifically for Kaby Lake Refresh Chromebooks. Alternatively, rely on USB audio or Bluetooth speakers, which work flawlessly.
Storage Performance
If you upgraded to a high-speed NVMe drive on the Core i7 model, you can expect read speeds exceeding 3000 MB/s, making the system feel incredibly snappy—a massive leap over the sluggish eMMC storage found in lower-end Chromebooks.
6. The Verdict: Is It Worth It?
If you are comfortable with a screwdriver and a command line, the ASUS Chromebox 3 is a steal.
• For Home Labs: It makes a phenomenal low-power Plex server (especially the i7 version with Intel Quick Sync for transcoding).
• For Office Work: With 16GB RAM and an NVMe drive, it is indistinguishable from a $600 desktop tower.
Just remember: Check your processor before buying an SSD, use the USB-C port for 4K monitors, and hang on to that backup firmware file for dear life.